Building a Homelab Intranet
Shinwoo PARK
Introduction
I've always had a certain romantic ideal of homelabs and self-hosting.
Even though cost and practicality have kept me from maintaining servers and self-hosted services continuously, I've regularly self-hosted and used various services, and enjoyed having services of my own.
Since AI came along, I've gotten used to coding with it, and I’ve increasingly found myself building things I need. I’d then deploy them on my Linux server and run them there.
One inconvenience was that the things I built were mostly services only I would use. Adding a signup and login system to every service felt like a hassle, even when I asked AI to do it. And since each service had its own signup and login system, managing all the accounts also became cumbersome.
To solve these problems, I’d been using Cloudflare Tunnel and Access.
Cloudflare Tunnel reduced the hassle of dealing with nginx and ports, while Access solved my problems by serving as a trusted gateway and a unified authentication system.
But while I was in the military, I saw an intranet and its unified login system, and decided to try building an intranet for my own server instead of using Tunnel and Access.
Design
Tailscale
An intranet is a private network that can only be accessed from within an organization.
It can be built using a private VPN, a specific backbone, or a dedicated network.
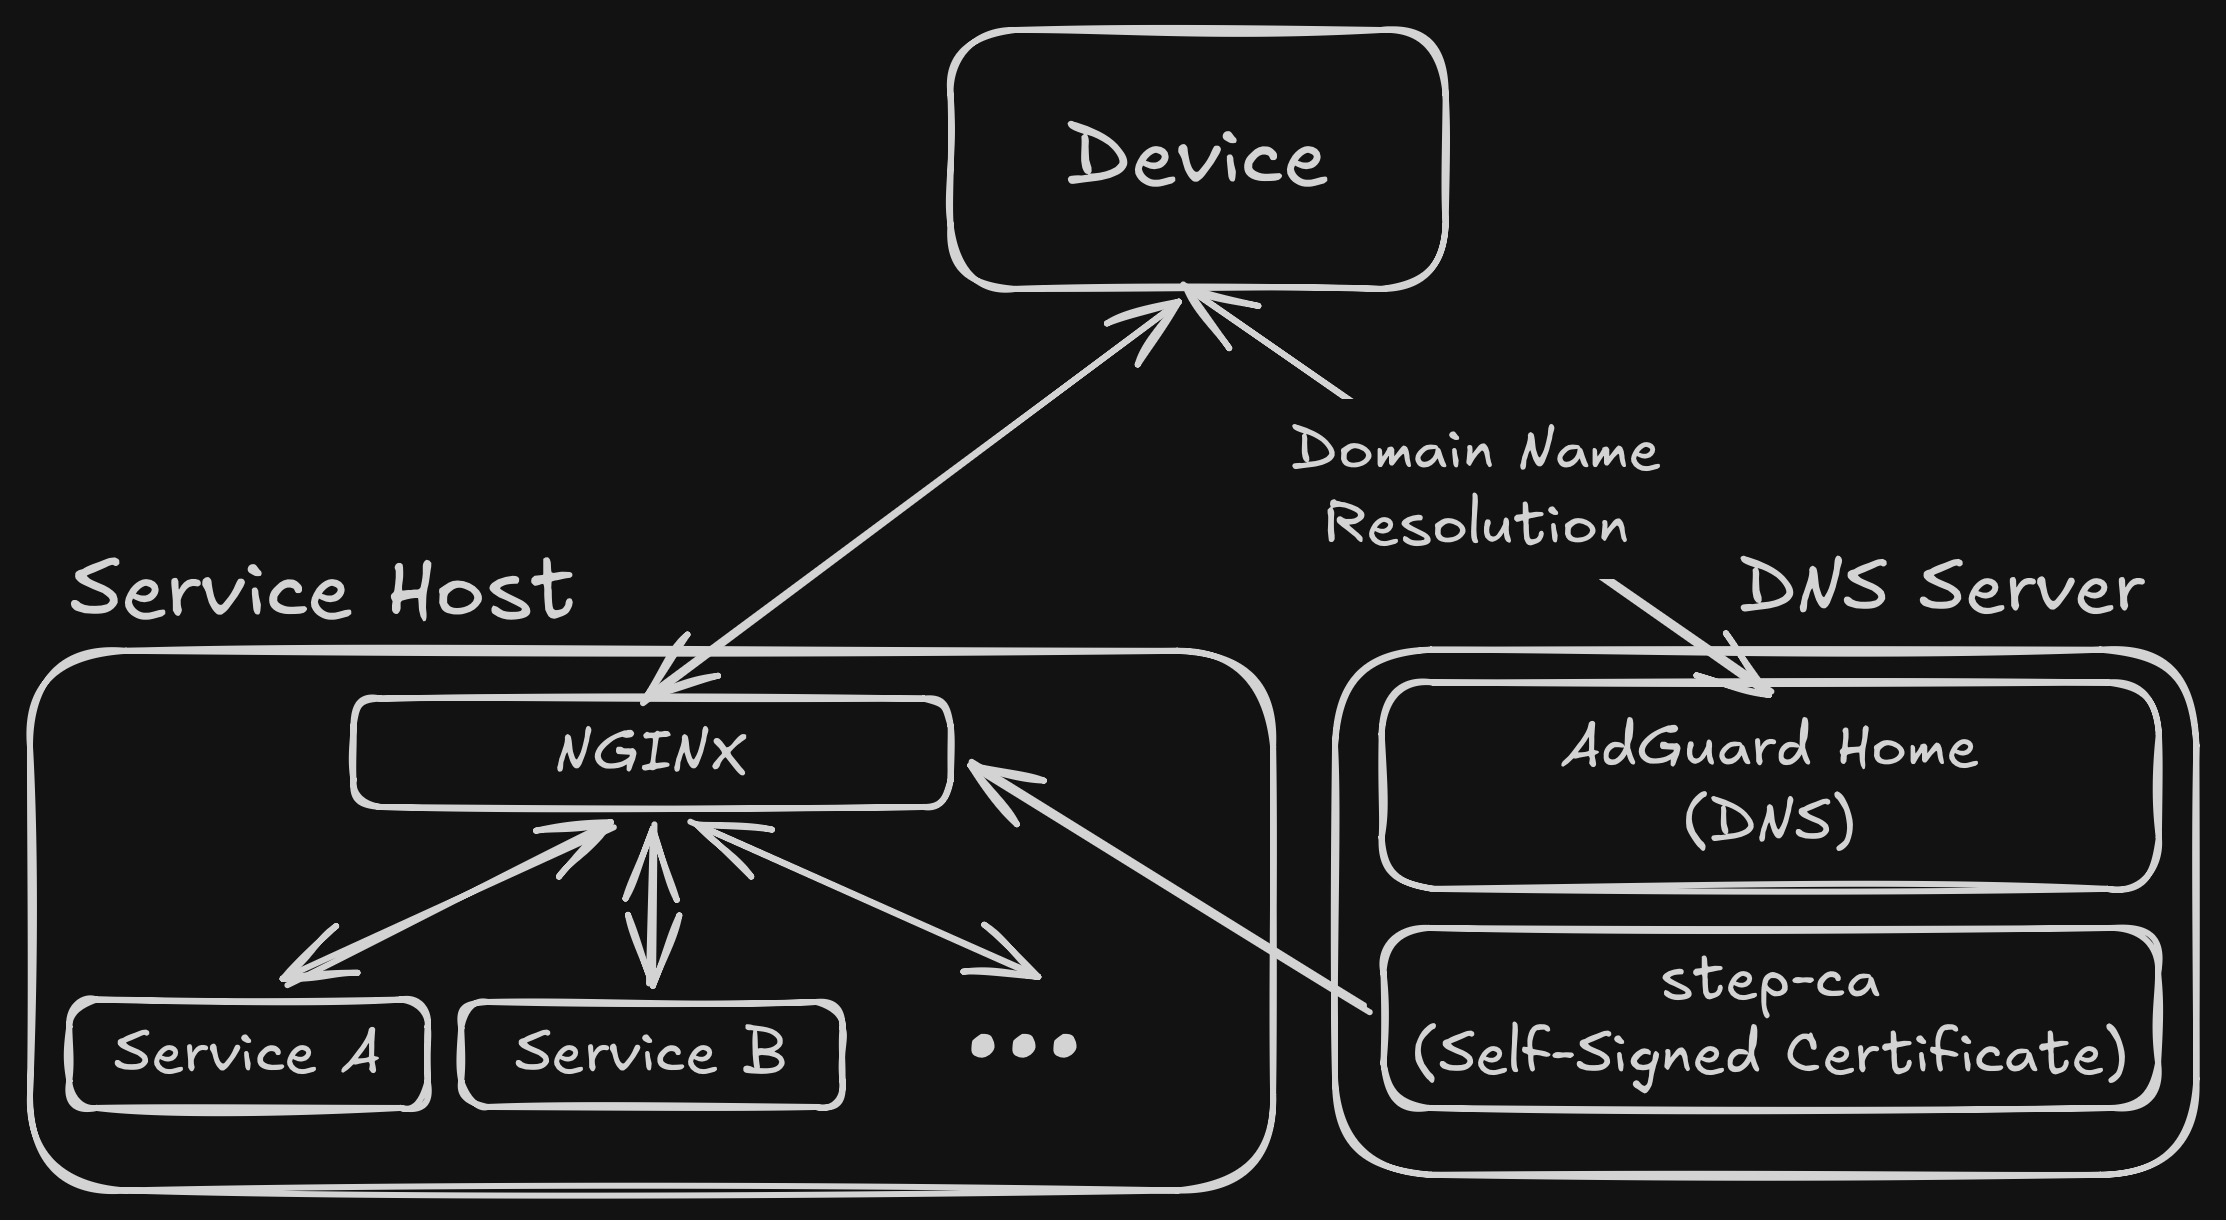
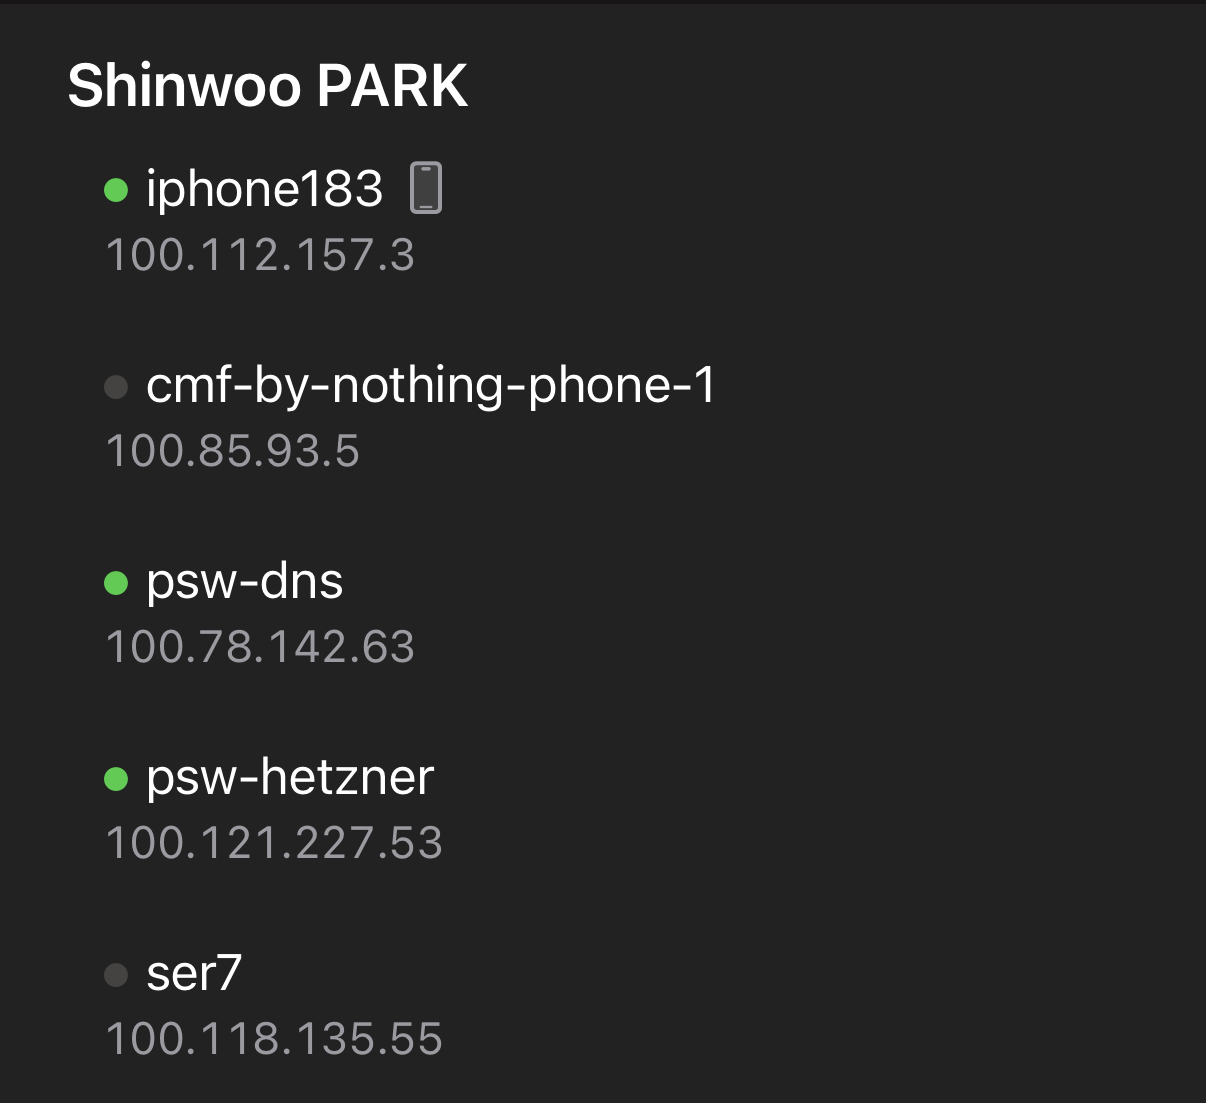
Tailscale is the core of my intranet. As a private VPN, Tailscale assigns Tailscale IP addresses to the devices of authenticated users, creating a virtual internal network.
Self-Hosting DNS
I also wanted to self-host DNS.
Of course, Tailscale has MagicDNS. However, it only supports *.ts.net domains, and you even have to use a randomly assigned domain, which was inconvenient.
On top of that, self-hosting AdGuard Home gives you ad blocking in addition to DNS, which is an extra benefit.
Fortunately, the issue of changing DNS settings on devices that connect to the intranet was easy to solve: Tailscale's Custom DNS setting lets connected devices use the DNS server you specify.
Self-Signed Certificate
When building the intranet, I wanted to create my own TLD (like memo.psw or auth.psw).
Certificates are usually issued after being signed by a trusted CA (Certificate Authority).
The problem with creating my own TLD was:
- A CA won't issue certificates for a TLD that doesn't exist
- Since this is an intranet environment, a public CA can't access or validate my TLD domain
So I needed a self-signed certificate.
For that, I used step-ca.
NGINX
Finally, I needed a reverse proxy on the service-hosting server to route requests to each service.
There were plenty of other options, of course, but I chose NGINX simply because I was already familiar with it.
Installing Tailscale
Before doing any installation or configuration, I first installed Tailscale on all my devices and servers to set up the private VPN that everything else would rely on.
For client devices such as Android, iOS, macOS, and Windows, install Tailscale from its website or the app store, then sign in.
For Linux headless servers, I used the following commands.
# Install
curl -fsSL https://tailscale.com/install.sh | sh

# DNS server — since I'm going to use my own DNS
sudo tailscale up --accept-dns=false

# Service server — standard connection
sudo tailscale up

# Check each server's Tailscale IP
 tailscale ip -4
The IP returned by
tailscale ip -4is the internal network IP used by Tailscale.
Installing and Configuring the DNS Server
1. Install AdGuard Home
I installed it easily with Docker Compose.
# /opt/adguardhome/docker-compose.yml
services:
  adguard-home:
    image: adguard/adguardhome:latest
    container_name: adguard-home
    volumes:
      - ./work:/opt/adguardhome/work
      - ./conf:/opt/adguardhome/conf
    restart: unless-stopped
    network_mode: host
After that, go to <tailscale-ip>:3000 to open the AdGuard Home initial setup page.
Once the initial setup is complete, port :3000 will close, and the service will be hosted on :80.
During initial setup, configure an admin account and make sure the DNS port is set to 53.
DNS Configuration
After completing the initial setup (:3000), go to the admin page (:80) and configure a few things.
1. Configure DNS rewrites (essential)
Web UI → Filters → DNS Rewrites → Add DNS Rewrite
Add the following DNS records.
*.psw→<service server tailscale ip>ca.internal→<DNS server tailscale ip>
pswis the TLD I'll use on my intranet. If you'd like to use a different TLD or domain, feel free to change it.
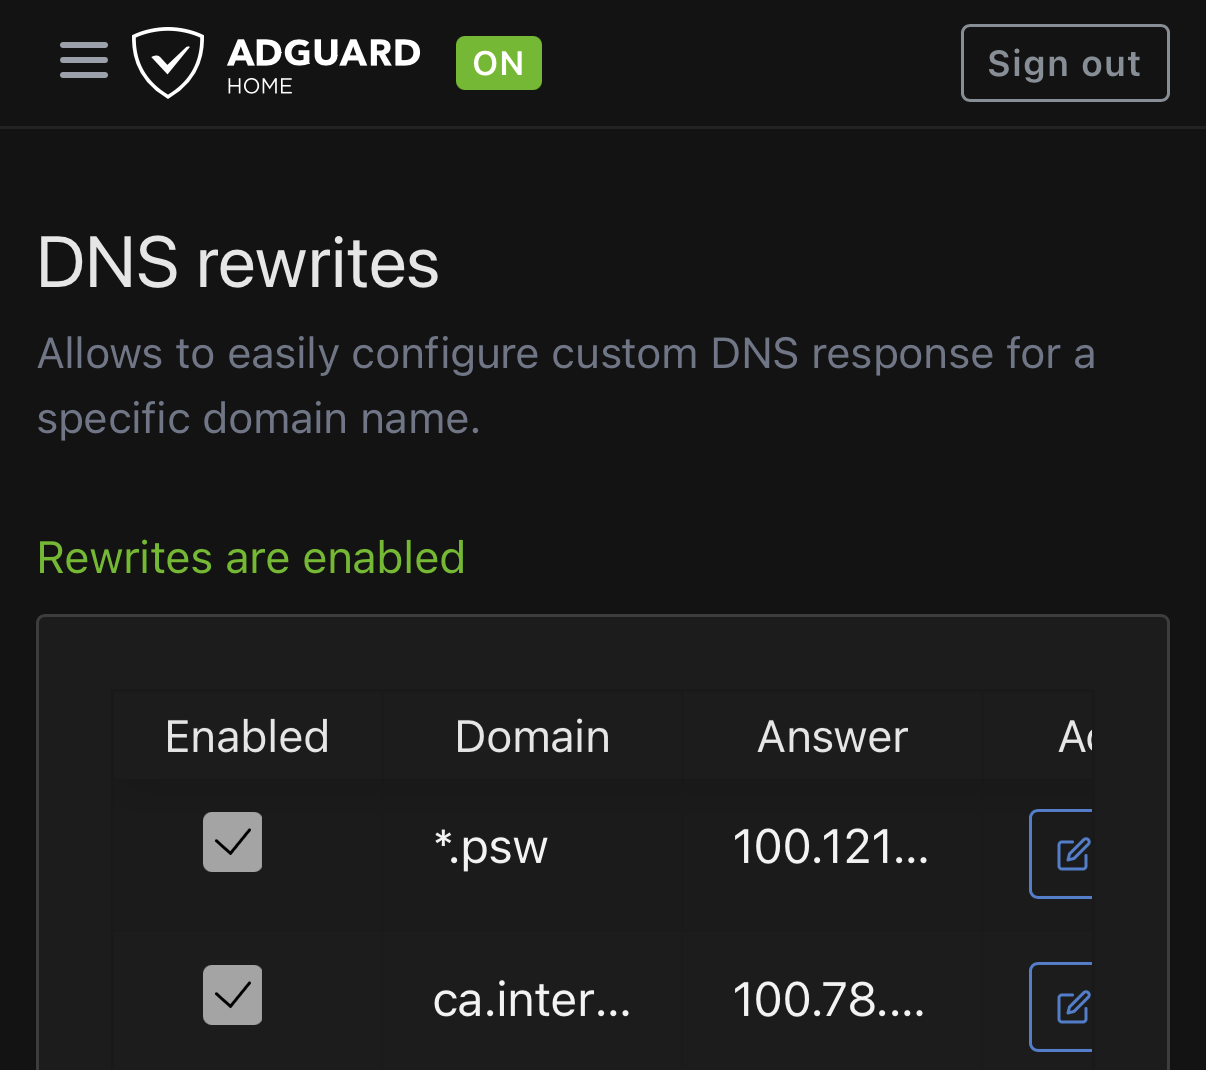
ca.internalis the domain used for CA requests. You can use a different domain if you like, but make sure to use it consistently in the configuration that follows.
2. Configure upstream DNS
Settings → DNS settings → Upstream DNS servers
https://1.1.1.1/dns-query
https://8.8.8.8/dns-query
By configuring upstream DNS, external domains that aren't part of the intranet are forwarded to public DNS servers.
In other words, you can still access external websites while connected to the intranet.
2. Configure Tailscale DNS
Configure this in the Tailscale Admin Console → DNS tab.
Nameservers → Add nameserver → click Custom
Enter the DNS server's Tailscale IP in the Nameserver IP field, then save.
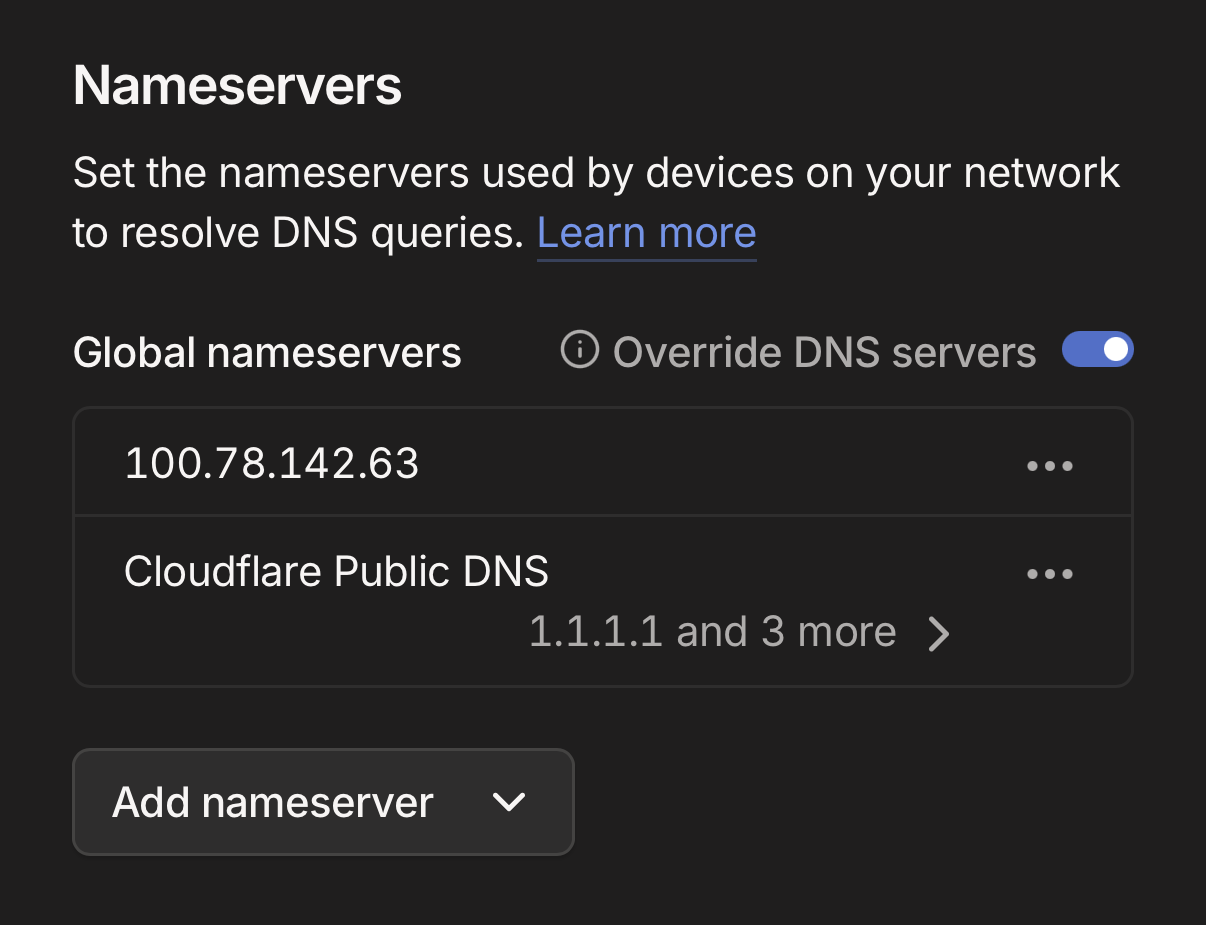
The Override DNS Servers option overrides the default DNS settings on devices connected to Tailscale.
If you don't enable this, the local DNS server will be used before Tailscale DNS, which defeats the purpose of installing AdGuard Home.
AdGuard Home is also safe to use because it has upstream DNS configured and is no different from other DNS servers in that respect.
3. Set Up an Internal CA
Install step-ca and the step CLI
# (Check for the latest version at github.com/smallstep/certificates)

# step-ca
wget https://dl.smallstep.com/gh-release/certificates/gh-release-header/v0.27.4/step-ca_linux_0.27.4_amd64.tar.gz
tar xzf step-ca_linux_0.27.4_amd64.tar.gz
sudo mv step-ca /usr/local/bin/

# step CLI
wget https://dl.smallstep.com/gh-release/cli/gh-release-header/v0.27.4/step_linux_0.27.4_amd64.tar.gz
tar xzf step_linux_0.27.4_amd64.tar.gz
sudo mv step_0.27.4/bin/step /usr/local/bin/
Initialize the CA
step ca init \
  --name "Home Internal CA" \
  --dns "ca.internal" \
  --dns "<DNS server tailscale ip>" \
  --address "<DNS server tailscale ip>:8443" \
  --provisioner "admin@internal" \
  --acme
Running this creates the following files.
~/.step/certs/root_ca.crt— root CA certificate~/.step/certs/intermediate_ca.crt— intermediate CA certificate~/.step/secrets/— private keys
Register and enable the systemd service
sudo cat > /etc/systemd/system/step-ca.service << 'EOF'
[Unit]
Description=step-ca Internal CA
After=network.target

[Service]
User=step
ExecStartPre=/bin/sh -c 'until ip -4 addr show tailscale0 | grep -q <DNS server tailscale ip>; do sleep 1; done'
ExecStart=/usr/local/bin/step-ca /home/step/.step/config/ca.json
Restart=on-failure
RestartSec=10

[Install]
WantedBy=multi-user.target
EOF

sudo useradd --system --home /home/step --create-home step
sudo cp -r ~/.step /home/step/
sudo chown -R step:step /home/step/.step

sudo systemctl enable --now step-ca
ACME provisioner
Use the following command to check whether the provisioner exists.
step ca provisioner list
# There should be an "acme" provisioner
If it isn't there, add it with this command.
step ca provisioner add acme --type acme
4. Nginx + Certificate Issuance
Perform this step on the service server.
Install Nginx and certbot
sudo apt update && sudo apt install -y nginx certbot
Create an Nginx configuration
Nginx was already installed on my server and was serving existing services, so I created the /etc/nginx/intra.d directory to separate externally exposed services from intranet services.
Create an Nginx configuration file as follows.
server {
        listen <service server tailscale ip>:80;
        server_name <domain>;

        location ^~ /.well-known/acme-challenge/ {
                root /var/www/certbot;
                default_type text/plain;
                try_files $uri =404;
        }

        location / {
                return 301 https://$host$request_uri;
        }
}

server {
        // Enable after issuing the first certificate
        // listen <service server tailscale ip>:443 ssl;
        listen <service server tailscale ip>:443;
        server_name <domain>;

        // Enable after issuing the first certificate
        // ssl_certificate /etc/letsencrypt/live/env.psw/fullchain.pem;
        // ssl_certificate_key /etc/letsencrypt/live/env.psw/privkey.pem;

        location / {
                proxy_pass http://127.0.0.1:<service port>;
                proxy_set_header Host $host;
                proxy_set_header X-Real-IP $remote_addr;
                proxy_set_header X-Forwarded-For $proxy_add_x_forwarded_for;
                proxy_set_header X-Forwarded-Proto $scheme;
        }
}
Since certificates are issued using the HTTP-01 webroot method, add a root and try_files directive to Nginx so it can serve the challenge files.
Before issuing the first certificate, the certificate files don't exist, so leave SSL disabled and just have the server listen on port 443. Once the certificate has been issued, enable SSL.
Issue a certificate
Assume you've copied the root certificate created during CA initialization to the service server.
sudo certbot certonly \
  --webroot -w /var/www/certbot \
  --server https://ca.internal:8443/acme/acme/directory \
  -d <domain>
This will issue a certificate, and certbot will handle renewal automatically.
In other words, after the first certificate has been issued for this domain, you won't need to worry about renewals.
However, even when certbot renews the certificate, Nginx won't restart automatically, which could cause it to keep using the old certificate.
So you need to add a hook to certbot to restart Nginx after a certificate is renewed.
sudo mkdir -p /etc/letsencrypt/renewal-hooks/deploy

printf '#!/bin/sh\nset -e\nnginx -t\nsystemctl reload nginx\n' \
  | sudo tee /etc/letsencrypt/renewal-hooks/deploy/reload-nginx.sh >/dev/null

sudo chmod 755 /etc/letsencrypt/renewal-hooks/deploy/reload-nginx.sh
5. Install the Root Certificate
This is the final step.
Even if a certificate has been issued, a CA we created ourselves isn't trusted by default.
If you connect to Tailscale and visit an Nginx-configured domain without installing the root certificate, your browser will complain that the certificate isn't trusted.
So we need to tell the devices we use that “the authority that issued this certificate can be trusted.”
That's what installing the root certificate does.
On an iPhone (iOS)
- Transfer the root certificate to your phone.
- Find and open the root certificate in Files. A “Profile Downloaded” message will appear.
- Go to Settings and install the profile.
- Settings → General → About → Certificate Trust Settings
- Under “Enable Full Trust for Root Certificates,” turn on the Home Internal CA toggle.
On Android
- Transfer the root certificate to your phone.
- Find and open the root certificate in your files. Android will detect it and show a certificate installation prompt.
Note: If you're developing an app that needs to access the intranet, the app won't be affected by this certificate setting. Therefore, you need to add the certificate to the network security configuration during app development.
<network-security-config>
    <base-config cleartextTrafficPermitted="false">
        <trust-anchors>
            <certificates src="system" />
            <certificates src="user" />
        </trust-anchors>
    </base-config>
</network-security-config>
On Windows
- Win + R →
certmgr.msc - Trusted Root Certification Authorities → right-click Certificates → All Tasks → Import
- Select the root certificate file → save it in the Trusted Root Certification Authorities store
You can also do it all at once with PowerShell.
Import-Certificate -FilePath "root_ca.crt" `
  -CertStoreLocation Cert:\LocalMachine\Root
Building the Intranet
I first learned about Tailscale while looking for an easier way to access my local development server during remote development.
However, Tailscale's tunneling and MagicDNS seemed too complicated and cumbersome for my original purpose, and I forgot about it before learning much about what kind of service Tailscale was.
But as soon as I started thinking about building an intranet, Tailscale was the first thing that came to mind. In the end, I think it was the best choice.
If Tailscale had been expensive, I probably would have given up.
But thanks to its generous policy of limiting only the number of users who can join a group, while allowing unlimited device registrations, I was able to make my intranet dream a reality.
It also made me want to learn a little more about networking.
Even while building the intranet, I only understood how network traffic flowed. I worked without understanding exactly how Tailscale works or how DNS changes on Linux, for example.
I’m sure learning more about Tailscale will play a big part in building my computer science knowledge.